21 August 2013

Little Sawtooth Stars

You might remember that in May I blogged about our guild project which we are to have completed by the November meeting.  You can read about it here to see the instructions which we were given.  We will be overseas on our exciting and long awaited cruise on the Queen Elizabeth in October, arriving home mid October so I thought I had better get my piece done as it might be a tad difficult to get into it as soon as we arrive home!

I chose to do these little Sawtooth Stars with the tiny pieces cut between 1¼ and 2 inches square and then pieced together to form the star pattern in colours that would tone with our given border fabric.


Sawtooth Stars


I think the colours blend quite well and the finished piece measures 22 inches (56cm) square.  There was not enough border fabric over to do the binding so I chose one of the fabrics from one of the stars.


I quilted it in an all over feather pattern perhaps better seen from the back.


This is my first project with the Golden Gate Quilters Guild, so now back to planning our itinerary....
Thank you for visiting!

Happy quilting,


30 July 2013

Winter seeds Tabletopper

Another small project completed.  Actually I'm really enjoying the smaller projects at the moment, it's a change from the larger quilts, which I really love making, but with hectic days planning our overseas trip, it's nice to start a project that doesn't take too much time and concentration while waiting for emails to arrive with questions answered re flight enquiries, insurances required etc etc.

I was needing something for our round dining room table and just never found a pattern that appealed to me.  Then along came this cute pattern from Julie at thecraftyquilter.com for a winter table topper which I could make with fabric on hand without having to make a trip to buy fabric.  So without further ado....

Winter Seeds Table Topper


I just did a whole lot of straight line and echo quilting which I feel emphasises the shape of the "seeds".  Julie has a very good tip on how to stitch the binding on the inside curves.  A quick link back to her blog is here.
And here it is in situ....


Thank you for visiting my blog for a brief update.  Now back to planning......

I am linking up with Marelize at Anything goes linky party.

Happy quilting,


8 July 2013

Quilt Festival - Bloemfontein, South Africa

Hubby and I spent a wonderful day at the Bloemfontein Quilt Festival wandering around looking at the exhibition of 270 beautifully made quilts submitted in various categories.

The category I chose for mine was "Traditional - Large" being over 150cm square.  It is my Chocolat et Créme which you have probably seen before on my blog.  I pieced it in a design which left me with a lot of negative space allowing me to express my passion in free motion quilting.  I know that it was not perfect as there were one or two areas where I found that I had too much fabric over which to quilt, therefore forming a crease.  But I've learned my lesson  - stitch in the ditch ESS - EVERY STINKING SEAM; Peggy Martin's advice in a tutorial I did on Craftsy.  Had I done that, my mishap would never have happened!  But anyway I was really thrilled with the Judges' comments and through looking at what everyone else had done, I don't think I had done too badly!

Moi with my quilt


Judges' comments


There were some very impressive quilts exhibited and here are a few that really caught my eye.


 Chocolat et Créme in situ.


The theme was "Kaleidoscope" beautifully depicted in these three all of which won a ribbon.


This one was similar to mine.  There were little flowers embroidered which made it very interesting as well as the border detail.
Here is a close up of some detail in the quilt


Beautiful applique


An old singer with a beautiful piece of lace appliqued under the needle.  Can you see the tiny bit of thread hanging loose from the needle!


Lots of different faces appliqued.


This quilt won a "first" in it's category.


A ribbon in this category which unfortunately I can't remember but the colours were magnificient.


This "game reserve" quilt was expertly appliqued with the elephant in the foreground and various animals and birds hidden in the foliage.  Can you see the leopard lying on a branch just above center?


This was a scene looking through a window with a door and handle to the left.  In the front on the window ledge were a few items appliqued with a little cloth hanging over the edge.


This cute little quilt depicted a dolls  house with the front of the building on one side and on the back was appliqued the various rooms in the house.  The detail was incredible. 
Can you see the little spider and spider web at the top of the first and third rooms?


The gradations of colour shading in this quilt with it's various ribbons was really expertly done!
The Coetzee family in the Anglo-Boer War

Oh my word!  This quilt was definitely something special.  It measured 6.38m by 3.34m and was completed in 3 months.  The 15 "windows" once completed were sent to people who had the necessary equipment required to join the blocks together and quilt them.  It has been donated to the War Museum in Bloemfontein as part of the Centenary celebrations of the "Vrouemonument".  (Monument to the women).  


This quilt won 2nd in the WORLD in Paducha, USA and was on display.  Excuisite does not adequately describe this needle-turned appliqued quilt.  Some of my USA followers may have seen this quilt before.


Hand appliqued quilt winning 2 ribbons.


Orange Peel pattern - here again the colouring was beautifully done.
Best on Show - hand appliqued.

There were many classes given by experienced local and overseas teachers during the course of the week, but unfortunately one day did not allow me to take part in any of them.  Perhaps next time, but I did make use of the Vendor's Hall!

I enjoyed sharing part of this lovely exhibition with you.  Thank you for visiting.  Please call back again soon as I will be showing a cute little baby quilt that I have made and a tutorial as well.


7 June 2013

Fabric Postcard Tutorial

I have done a quick tutorial on making fabric postcards.  There are a few of us who have joined a swap and each month we are given a partner to whom we must send a fabric postcard with free motion quilting on it that we learned from our FMQ Challenge in 2012.  It is so exciting to receive lovely fabric postcards from virtually all over the world!  So, let me show you how we make them.

Top and Batting

Firstly, decide what you would like to do for the postcard front.  It can either be pieced as I have done or an appliqued picture or even just a plain piece of fabric.  The stipulation we make in our swap group is that it must have some free motion quilting on it.  The finished size of a postcard is 6"x4" and I would suggest you add on about ½" all around.  Pin it onto a piece of batting roughly the same size.  You are now going to quilt it.  

Quilting the top


Attach your quilting/darning foot and lower your feed dogs.  Quilt a design removing the pins as you go.  (Good practice for your quilting)!


Buckram


I use Buckram as the stiffening layer as it is easily available in the small town where I live.   Timtex is a similar product.  Fast2Fuse and Pelon can also be used at this stage.  If using Buckram or Timtex, fusible web should be used to attach it to the batting.  I actually use some 505 adhesive spray, so either will work.  Press the stiff material well onto the batting side of your postcard or iron (without steam) if your product has adhesive.

Fusible Web


Next iron a piece of fusible web onto the Buckram, remembering to have the sticky side down (not like I have in the photo)!  Fortunately I didn't put my hot iron onto it before I noticed it!


Peeling off the paper

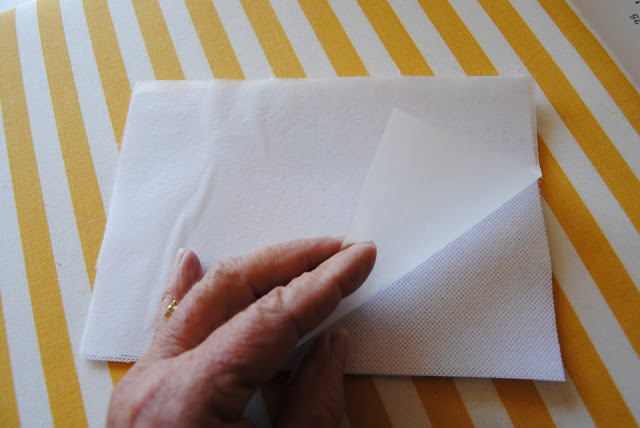
Peel off the paper backing exposing the second glue side of the fusible web.  You will then iron on your plain white or pale colour fabric which will be the back of your postcard where you will write the address.

Trim to size


We are almost done.  With ruler and rotary cutter, trim your postcard to the required size ie 6"x4" centering your quilted design.


Zigzag around edge


Now back to your machine, attach your walking foot, raise your feed dogs and in your chosen thread colour zigzag all around the edge.  I set my stitch width at 4 and length at about 1.5.  You will also notice that I have rounded the corners as I find it easier when I do the satin stitch edging, but they can be left square.  Once you have done this, take a sharp pair of embroidery scissors and trim off all the little fluffy edges - or as much as you can without snipping the zigzag stitches!


Here is a close-up of the fluffy edge against a dark background.

Satin stitch edging


Back to your machine for the satin stitching.  I set my stitch length at .25 and leave the stitch width at 4.  Sew all around the edge with a nice close satin stitch.  Sometimes it may be necessary to go around again to close up some little gaps especially on the corners.


I like to do another round in a gold or silver metalic thread.  You MUST use a topstitch 90/14 needle or the thread will shred.  Use a normal zigzag stitch, perhaps shortening the stitch length slightly.


It's not very clear in the photo as the light was very bright in my sewing room, but I used a pale green Colorful embroidery thread for the satin stitching and a gold metalic thread over the top.


Back of postcard

And there you have your finished postcard!  All that needs to be done now is using a fine permanent marker, write "POST CARD" on the back and it is ready to write your greeting and address.  After making this postcard, I realized that "POSTCARD" should be written across the top and not down the center as in the photo. 

It is great fun to send and receive a postcard "naked" (without being in an envelope) from all around the world.  I would be tickled if you would have a go at making one.  Please leave me a message if you have any questions and I will try to answer them; and I would love to see what you have made.

You are most welcome to join us in our swap.  We are a Facebook group and by clicking here you can see what others have made.  Leave a message for Tina Gilley and she will contact you. 


Happy postcard making,

29 May 2013

Guild Project

Decisions, decisions!  We received a ¼ meter of quilt fabric at our last guild meeting with very clear instructions.

Fabric to be used in border


Translation:

1.   Use scraps no larger than 2 inches.
2.   Use your piece of fabric for the border.
3.   Finished project no smaller than 50cm x 50cm and no larger
      than 70cm x 70cm.  (Roughly 20" and 27½")
4.   Project to be shown at November meeting.
5.   R50 fine if project is not completed.

2 inch pieces!  Oh my goodness, this is going to take some time I suspect.  So out with some samples of fabric to use.  

Amafu hand dyed fabric

I could keep it plain with some hand dyed fabric.


Grand Finale

I could use a charm pack,  Grand Finale by Sandy Gervais for Moda, or....


Urban Couture


another charm pack I have, Urban Couture by Basic Grey for Moda.  I have two each of these charm packs cut into 4 would give me finished pieces of 2 inches but I doubt that I would have to use two charm packs if I also use a plain cream as well.

HSTs could work, hexies could work or umm.... I'll have to spend some time planning.  

Thank you for dropping by and any suggestions would be most welcome!

Happy quilting,


26 May 2013

Blogger's Quilt Festival

Hi there everyone,

Amy at Amy's Creative Side is hosting a Blogger's Quilt Festival which runs until May 30 2013.  There are many categories that can be entered into and I have entered two of my quilts into two different categories.  The first one is in the category "Two Color Quilts" and can be found by clicking HERE.  It is number 26.  Here is a pic of it.


Entered in "Two Color Quilts"


The other is in the category "Home Machine Quilted Quilts" and can be found by clicking HERE.  It is number 24 and here it is.

Entered in "Home Machine Quilted Quilt"


These are my first ever quilt competition entries and I would really appreciate it if you would like to vote for me.  Enjoy looking over the entries in the other categories; there are some beautiful quilts out there and I've really had difficulty voting in the various categories.

Thank you for taking the time to vote.

Happy quilting,