Showing posts with label Tutorial. Show all posts

18 December 2013

Stupendous Stitching


The last class I did with Craftsy was Carol Ann Waugh's Stupendous stitching.  We all have those lovely decorative stitches on our sewing machines but when do we actually use them in our quilting.  Are you like me answering, "Well never".  In her class, Carol Ann shows how these stitches can be used in a very simple but very effective way to create something just a little different.  Here is the sample I made from watching her class.


Stupendous Stitching Sample


In this small sample I used different decorative stitches in a variety of colours as well as some hand embroidery using simple straight stitches and French Knots.

Hmm I then had the idea of using this method to make a new cover for the back of my hand mirror on my dressing table.  Hubs gave me this dressing table set probably 50+ years ago when I was still at school - wow imagine that - and all that is left of it is the hand mirror which I happen to use every single day even though the mirror was cracked across the top.  So I set to work cutting out a rough pattern the shape of the mirror and ironing on a piece of vilene which stabilizes the top fabric on which I will do the decorative stitching.


Then comes the embellishing and fancy stitching and finishing off with some hand embroidery.


I then added a piece of batting and quilted around the decorative stitching.


The next step was to pack the template behind the prepared piece and somehow come up with a way to keep its shape.  I crisscrossed some stitching at the back which seemed to do the trick!


I had a new piece of mirror cut to exactly the same shape as the metal frame but unfortunately the small glass factory in town in our local town could not bevel the edges.  What a disappointment as I then had to undo all the crisscross stitching at the back and cut the quilted top to exactly the same shape as the backing as the bulk of the mirror as well as my prized piece of stupendous stitching would not fit into the small groove of the mirror frame.  Oh well, it still worked after I glued the edge of the top onto the cardboard template which I then left intact and it fitted beautifully.

I polished up the very tarnished handle and frame, and wallah.....


My new hand mirror, well as good as new anyway!

Hand mirror and table topper to match!


So this was another use for some stupendous stitching and I'll surely come up with other things to make as well.

Thank you for stopping by and I wish all my followers a Blessed Christmas and a Happy and Healthy 2014.




7 June 2013

Fabric Postcard Tutorial

I have done a quick tutorial on making fabric postcards.  There are a few of us who have joined a swap and each month we are given a partner to whom we must send a fabric postcard with free motion quilting on it that we learned from our FMQ Challenge in 2012.  It is so exciting to receive lovely fabric postcards from virtually all over the world!  So, let me show you how we make them.

Top and Batting

Firstly, decide what you would like to do for the postcard front.  It can either be pieced as I have done or an appliqued picture or even just a plain piece of fabric.  The stipulation we make in our swap group is that it must have some free motion quilting on it.  The finished size of a postcard is 6"x4" and I would suggest you add on about ½" all around.  Pin it onto a piece of batting roughly the same size.  You are now going to quilt it.  

Quilting the top


Attach your quilting/darning foot and lower your feed dogs.  Quilt a design removing the pins as you go.  (Good practice for your quilting)!


Buckram


I use Buckram as the stiffening layer as it is easily available in the small town where I live.   Timtex is a similar product.  Fast2Fuse and Pelon can also be used at this stage.  If using Buckram or Timtex, fusible web should be used to attach it to the batting.  I actually use some 505 adhesive spray, so either will work.  Press the stiff material well onto the batting side of your postcard or iron (without steam) if your product has adhesive.

Fusible Web


Next iron a piece of fusible web onto the Buckram, remembering to have the sticky side down (not like I have in the photo)!  Fortunately I didn't put my hot iron onto it before I noticed it!


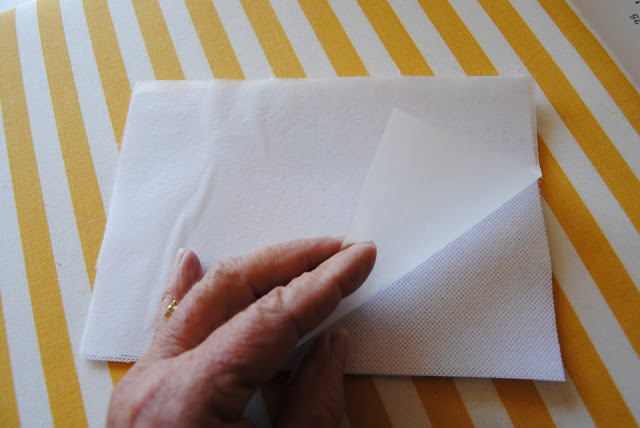
Peeling off the paper

Peel off the paper backing exposing the second glue side of the fusible web.  You will then iron on your plain white or pale colour fabric which will be the back of your postcard where you will write the address.

Trim to size


We are almost done.  With ruler and rotary cutter, trim your postcard to the required size ie 6"x4" centering your quilted design.


Zigzag around edge


Now back to your machine, attach your walking foot, raise your feed dogs and in your chosen thread colour zigzag all around the edge.  I set my stitch width at 4 and length at about 1.5.  You will also notice that I have rounded the corners as I find it easier when I do the satin stitch edging, but they can be left square.  Once you have done this, take a sharp pair of embroidery scissors and trim off all the little fluffy edges - or as much as you can without snipping the zigzag stitches!


Here is a close-up of the fluffy edge against a dark background.

Satin stitch edging


Back to your machine for the satin stitching.  I set my stitch length at .25 and leave the stitch width at 4.  Sew all around the edge with a nice close satin stitch.  Sometimes it may be necessary to go around again to close up some little gaps especially on the corners.


I like to do another round in a gold or silver metalic thread.  You MUST use a topstitch 90/14 needle or the thread will shred.  Use a normal zigzag stitch, perhaps shortening the stitch length slightly.


It's not very clear in the photo as the light was very bright in my sewing room, but I used a pale green Colorful embroidery thread for the satin stitching and a gold metalic thread over the top.


Back of postcard

And there you have your finished postcard!  All that needs to be done now is using a fine permanent marker, write "POST CARD" on the back and it is ready to write your greeting and address.  After making this postcard, I realized that "POSTCARD" should be written across the top and not down the center as in the photo. 

It is great fun to send and receive a postcard "naked" (without being in an envelope) from all around the world.  I would be tickled if you would have a go at making one.  Please leave me a message if you have any questions and I will try to answer them; and I would love to see what you have made.

You are most welcome to join us in our swap.  We are a Facebook group and by clicking here you can see what others have made.  Leave a message for Tina Gilley and she will contact you. 


Happy postcard making,